Install HA Swarm with GlusterFS
Setup Highly Available applications with Docker Swarm and Gluster
A good design pattern for highly available applications is to deploy the application as a container on a Docker Swarm cluster with persistent storage provided by GlusterFS. GlusterFS is a fast shared filesystem that can keep the container volume in sync between multiple VMs running the Docker Swarm cluster. This pattern ensures high availability for your containerised application. In the event a VM dies, Docker Swarm will spin up the container on another VM. GlusterFS will ensure the container has access to the same data when it comes up.
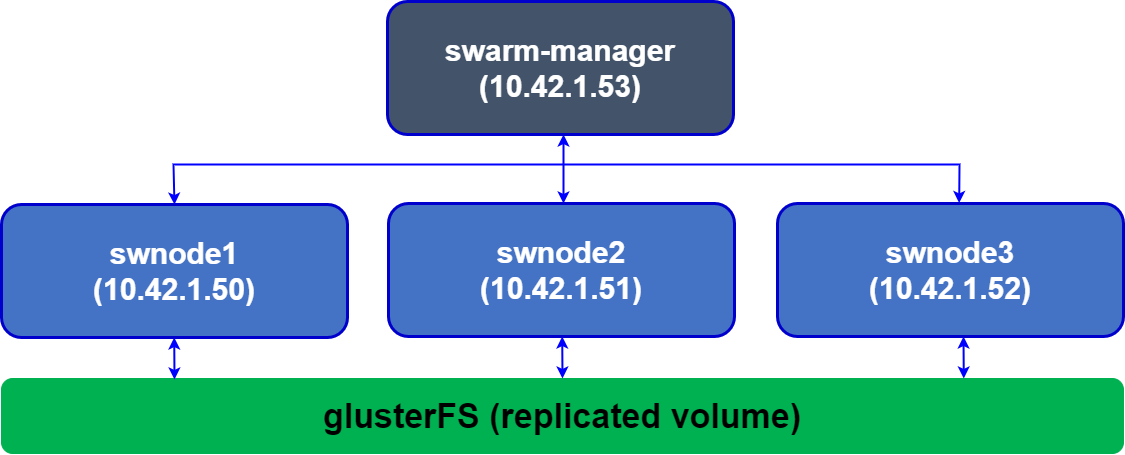
In this setup, we’ll look at setting up GlusterFS on 3 VMs and create a replicated volume with a replication factor of 3. We install Docker Swarm over these three VMs. Goal is to use GlusterFS to provide persistent storage to your application container, and docker swarm for high availability.
1. Plan and setup the infrastructure
For the setup, first we’ll need three Ubuntu Gluster VMs, each with 2 disks attached. We’ll use the first disk to run the OS, and the second as the GlusterFS replicated volume. Create three VMs with two disks. In my case, my VMs had the root volume on /dev/vda and the second disk on /dev/vdb. Create three VMs and let’s assume the private IPs of these VMs are 10.42.1.50, 10.42.1.51, 10.42.1.52, and their hostnames are swnode1, swnode2, swnode3.
Note
All commands are being executed as root user
nimda@swnode1:~$ sudo lsblk
NAME   MAJ:MIN RM  SIZE RO TYPE MOUNTPOINTS
sr0     11:0    1 1024M  0 rom
vda    253:0    0   64G  0 disk
├─vda1 253:1    0    1G  0 part /boot/efi
└─vda2 253:2    0 62.9G  0 part /
vdb    253:16   0   64G  0 disk
Update the /etc/hosts files on each VM to reflect the private IPs of each VM. This is important for GlusterFS, and you may encounter bugs or issues if you give private IPs directly to Gluster volumes. After editing the files should look like:
nimda@swnode1:~$ sudo cat /etc/hosts
127.0.0.1 localhost
10.42.1.50 swnode1
10.42.1.51 swnode2
10.42.1.52 swnode3

nimda@swnode2:~$ sudo cat /etc/hosts
127.0.0.1 localhost
10.42.1.50 swnode1
10.42.1.51 swnode2
10.42.1.52 swnode3

nimda@swnode3:~$ sudo cat /etc/hosts
127.0.0.1 localhost
10.42.1.50 swnode1
10.42.1.51 swnode2
10.42.1.52 swnode3
Format the disks with xfs filesystem on each VM in case you haven’t already. You can also use ext4 if you prefer.
2. Create directories for GlusterFS storage
Setup the glusterFS directories where the gluster “bricks” will reside. Better to name them differently so it’s easy to identify on which node the replicated volumes reside. Also add an entry to your /etc/fstab file on each VM so that our brick gets mounted when the operating system boots or restarts.
nimda@swnode1:~$ sudo mkdir -p /node1/bricks/1
nimda@swnode1:~$ sudo echo '/dev/vdb /node1/bricks/1 xfs defaults 0 0' >> /etc/fstab
nimda@swnode1:~$ sudo mount -a
nimda@swnode1:~$ sudo mkdir /node1/bricks/1/brick

nimda@swnode2:~$ sudo mkdir -p /node1/bricks/2
nimda@swnode2:~$ sudo echo '/dev/vdb /node2/bricks/2 xfs defaults 0 0' >> /etc/fstab
nimda@swnode2:~$ sudo mount -a
nimda@swnode2:~$ sudo mkdir /node2/bricks/2/brick

nimda@swnode3:~$ sudo mkdir -p /node1/bricks/3
nimda@swnode3:~$ sudo echo '/dev/vdb /node3/bricks/3 xfs defaults 0 0' >> /etc/fstab
nimda@swnode3:~$ sudo mount -a
nimda@swnode3:~$ sudo mkdir /node3/bricks/3/brick
3. Install GlusterFS
Install GlusterFS on all VMs by executing following commands on each VM:
sudo apt-get -y update && apt-get -y upgrade
sudo apt-get install -y software-properties-common
sudo add-apt-repository ppa:gluster/glusterfs-11 && apt-get update # Latest glusterFS version
sudo apt-get install -y glusterfs-server
sudo systemctl enable glusterd # automatically start glusterfs on boot
sudo systemctl start glusterd # start glusterfs right now
sudo systemctl status glusterd # Should show status active
4. Peer with other Gluster VMs
Now peer with other nodes from gluster1:
nimda@swnode1:~$ gluster peer probe swnode2
peer probe: success.
nimda@swnode1:~$ gluster peer probe swnode3
peer probe: success.
nimda@swnode1:~$ sudo gluster peer status
Number of Peers: 2

Hostname: swnode2
Uuid: 6f3d9125-c4ab-4f5a-9ad2-f7bcea684fa5
State: Peer in Cluster (Connected)

Hostname: swnode3
Uuid: f0022060-3378-4848-ba36-f3d5a23e3710
State: Peer in Cluster (Connected)
5. Setup the Gluster “replicated volume”
GlusterFS has multiple volume types. For our HA architecture, we want to setup a “replicated” volume that stores the files created on each of the 3 VMs and hence the file is available to any app or container running on these VMs. Create the replicated volume named “gfs” with 3 replicas:
nimda@swnode1:~$ sudo gluster volume create gfs \
replica 3 \
swnode1:/node1/bricks/1/brick \
swnode2:/node2/bricks/2/brick \
swnode3:/node3/bricks/3/brick
volume create: gfs: success: please start the volume to access data
nimda@swnode1:~$ sudo gluster volume start gfs
nimda@swnode1:~$ sudo gluster volume status gfs
Status of volume: gfs
Gluster process                             TCP Port  RDMA Port  Online  Pid
------------------------------------------------------------------------------
Brick swnode1:/node1/bricks/1/brick         59641     0          Y       4839
Brick swnode2:/node2/bricks/2/brick         53330     0          Y       4468
Brick swnode3:/node3/bricks/3/brick         57670     0          Y       4238
Self-heal Daemon on localhost               N/A       N/A        Y       4871
Self-heal Daemon on swnode3                 N/A       N/A        Y       4270
Self-heal Daemon on swnode2                 N/A       N/A        Y       4500

Task Status of Volume gfs
------------------------------------------------------------------------------
There are no active volume tasks
nimda@swnode1:~$ sudo gluster volume info gfs

Volume Name: gfs
Type: Replicate
Volume ID: 085ccf18-7a7e-4224-85df-da89d40bfeb4
Status: Started
Snapshot Count: 0
Number of Bricks: 1 x 3 = 3
Transport-type: tcp
Bricks:
Brick1: swnode1:/node1/bricks/1/brick
Brick2: swnode2:/node2/bricks/2/brick
Brick3: swnode3:/node3/bricks/3/brick
Options Reconfigured:
auth.allow: 10.42.1.50,10.42.1.51,10.42.1.52
cluster.granular-entry-heal: on
storage.fips-mode-rchecksum: on
transport.address-family: inet
nfs.disable: on
performance.client-io-threads: off
6. Setup security and authentication for this volume
GlusterFS will allow any clients to connect to volumes by default. However, you will need to authorize the three infra VMs running GlusterFS to connect to the GlusterFS Volumes on each node. You can do it by authorizing the private IPs of each VM to connect to the volume. This will allow replication to happen. Execute:
7. Mount the glusterFS volume where applications can access the files
We’ll mount the volume onto /mnt on each VM, and also append it to our /etc/fstab file so that it mounts on boot:
nimda@swnode1:~$ sudo echo 'localhost:/gfs /mnt glusterfs defaults,_netdev,backupvolfile-server=localhost 0 0' >> /etc/fstab
nimda@swnode1:~$ sudo mount.glusterfs localhost:/gfs /mnt

nimda@swnode2:~$ sudo echo 'localhost:/gfs /mnt glusterfs defaults,_netdev,backupvolfile-server=localhost 0 0' >> /etc/fstab
nimda@swnode2:~$ sudo mount.glusterfs localhost:/gfs /mnt

nimda@swnode3:~$ sudo echo 'localhost:/gfs /mnt glusterfs defaults,_netdev,backupvolfile-server=localhost 0 0' >> /etc/fstab
nimda@swnode3:~$ sudo mount.glusterfs localhost:/gfs /mnt
8. Verify
Verify mounted glusterfs volume:
nimda@swnode1:~$ df -Th
Filesystem     Type            Size  Used Avail Use% Mounted on
tmpfs          tmpfs           794M  1.3M  793M   1% /run
efivarfs       efivarfs        256K   80K  172K  32% /sys/firmware/efi/efivars
/dev/vda2      ext4             62G  8.7G   50G  15% /
tmpfs          tmpfs           3.9G     0  3.9G   0% /dev/shm
tmpfs          tmpfs           5.0M     0  5.0M   0% /run/lock
/dev/vda1      vfat            1.1G  6.2M  1.1G   1% /boot/efi
tmpfs          tmpfs           794M   12K  794M   1% /run/user/1000
/dev/vdb       xfs              64G  1.4G   63G   3% /node1/bricks/1
localhost:/gfs fuse.glusterfs   64G  2.0G   62G   4% /mnt
The total space available on the volume comes up as 64G even though we have 3 disks of 64G each connected to GlusterFS. This is due to our replication factor of 3. Total volume size is 192G, but with a replication factor or 3 for each file only 64G is available to us.
Test GlusterFS replication:
nimda@swnode1:~$ sudo echo "Hello World!" | sudo tee /mnt/test.txt

nimda@swnode2:~$ sudo cat /mnt/test.txt
Hello World!

nimda@swnode3:~$ sudo cat /mnt/test.txt
Hello World!
Part 2: Verify High Availbility Swarm Cluster
We’ll use our gluster replicated volume to achieve High Availability for our stateful containerized application. We’ll test with Wordpress.
All commands executed as root.
We’ll use docker stack to setup a single container Wordpress backed by a single container of MySQL, and then test if this setup is resilient to VM failure.
1. Create replicated directories for wordpress and mysql in glusterFS
2. Create the wordpress-stack.yml file
This stack file exposes wordpress on port 8080 on all swarm nodes, even the swarm-manager node. It mounts the directories created for wp-content and mysql as volumes on the containers.
nimda@swnode1:~$ sudo cat wordpress-stack.yml

# wordpress-stack.yml
version: '3.1'
services:
  wordpress:
    image: wordpress
    restart: always
    ports:
      - 8080:80
    environment:
      WORDPRESS_DB_HOST: db
      WORDPRESS_DB_USER: exampleuser
      WORDPRESS_DB_PASSWORD: examplepass
      WORDPRESS_DB_NAME: exampledb
    volumes:
      - "/mnt/wp-content:/var/www/html/wp-content"
    deploy:
      placement:
        constraints: [node.role == worker]
  db:
    image: mysql:5.7
    restart: always
    environment:
      MYSQL_DATABASE: exampledb
      MYSQL_USER: exampleuser
      MYSQL_PASSWORD: examplepass
      MYSQL_RANDOM_ROOT_PASSWORD: '1'
    volumes:
      - "/mnt/mysql:/var/lib/mysql"
    deploy:
      placement:
        constraints: [node.role == worker]
3. Use docker stack to deploy Wordpress and MySQL
nimda@swnode1:~$ sudo docker stack deploy -c wordpress-stack.yml wordpress
Ignoring unsupported options: restart
Creating network wordpress_default
Creating service wordpress_db
Creating service wordpress_wordpress
swarm-manager:~# docker stack ps wordpress
ID                  NAME                    IMAGE               NODE                DESIRED STATE       CURRENT STATE           ERROR               PORTS
x5vvrt6ohko2        wordpress_db.1          mysql:5.7           swnode2             Running             Running 5 minutes ago
idree9r7qlxb        wordpress_wordpress.1   wordpress:latest    swnode1             Running             Running 5 minutes ago

Check if Wordpress is up by entering http://<any-worker-external-ip>:8080/ in the browser.
Note: 10.42.1.52 was one of my gluster worker VM’s (swnode3) external IP Go through the install process, choose an admin username and password, and create your first post.
4. Test High Availability by shutting down a VM
Check on which VM the Wordpress and MySQL containers are running. We’ll shutdown each VM to understand whether HA is working properly. In my case, the Wordpress container was running on swnode1 and MySQL was running on swnode2.
nimda@swnode1:~$ sudo docker stack ps wordpress
ID                  NAME                    IMAGE               NODE                DESIRED STATE       CURRENT STATE            ERROR               PORTS
x5vvrt6ohko2        wordpress_db.1          mysql:5.7           swnode2             Running             Running 24 minutes ago
idree9r7qlxb        wordpress_wordpress.1   wordpress:latest    swnode1             Running             Running 24 minutes ago
Shutdown swnode1 and check what happens. You’ll find that docker swarm starts a new container on a new worker VM. The website will continue to work, your data will still be stored, but you’ll have to login again as the session data is lost with the previous container.

nimda@swnode1:~$ sudo docker stack ps wordpress
ID                  NAME                    IMAGE               NODE                DESIRED STATE       CURRENT STATE                ERROR               PORTS
u8s93kowj2mx        wordpress_wordpress.1   wordpress:latest    swnode3             Running             Running 3 seconds ago
x5vvrt6ohko2        wordpress_db.1          mysql:5.7           swnode2             Running             Running 28 minutes ago
idree9r7qlxb        wordpress_wordpress.1   wordpress:latest    swnode1             Shutdown            Running about a minute ago
Start the swnode1 VM again and let’s repeat the HA test with MySQL host swnode2. Shutdown swnode2 which was running the MySQL container. After shutdown, you’ll find docker swarm has scheduled MySQL on another worker VM.

nimda@swnode1:~$ sudo docker stack ps wordpress
ID                  NAME                    IMAGE               NODE                DESIRED STATE       CURRENT STATE              ERROR               PORTS
px90rs5q22ei        wordpress_db.1          mysql:5.7           swnode1             Running             Preparing 41 seconds ago
u8s93kowj2mx        wordpress_wordpress.1   wordpress:latest    swnode3             Running             Running 6 minutes ago
x5vvrt6ohko2        wordpress_db.1          mysql:5.7           swnode2             Shutdown            Running 50 seconds ago
idree9r7qlxb        wordpress_wordpress.1   wordpress:latest    swnode1             Shutdown            Shutdown 3 minutes ago
The website will continue to work without any data loss as the MySQL container would have found the replicated volume under the same path (/mnt/mysql).
Add the three worker VM IPs with port behind a Load Balancer (like HAProxy, AWS ELB etc.) and voilà, A Highly Available stateful deployment on Docker Swarm using GlusterFS.